Schedule a Video Conference (VC) Live Webcast Event
| Caution: This feature is still in beta while additional certified devices are added. See Supported Video Conference (VC) System Integrations for a current list of supported devices. VBrick will be adding new certified devices on a regular basis. This is a Rev Cloud feature only and must be enabled by VBrick before you are able to create your Akamai Live device and begin scheduling VC Live events. |
You can use Rev cloud to broadcast your video conferencing software so that you take advantage of your video conference while using Rev’s Webcast features at the same time. In this case, you need to set your video source as your VC SIP address instead of Rev’s presentation profile. You also need to make sure you have added an Akamai Live device.
When a VC Live Webcast event is scheduled:
●An Akamai Live device must be set up first. (See:
Add an Akamai Live Device) Akamai is used to capture and forward the specialized VC session/stream to the viewers. Any viewer that is in a Zone that contains a DME v3.15 (or greater) will get the stream reflected from Akamai through the DME. There are some limitations based on bandwidth – please refer to the DME help topic: "Akamai Reflection of Video Conference Streaming and Recording" in DME Online help for details.
●It must be used throughout the event. In other words, you may not use a video conference as the source for half the event and then switch to a “traditional” source (camera/presentation profile) for the second half of the event. You must use one or the other source per event or an error will occur.
●When you choose to save the recording at the end of your Webcast using this new streaming option, it will count against your licensed recording hours.
●When you start a Webcast using this streaming option, the Webcast is automatically recorded. At the end of the Webcast, you will be asked if the recording should be saved.
●As noted above, this is a Rev Cloud feature only and must be enabled by VBrick before you are able to create your Akamai Live device and begin scheduling VC Live events.

To create a VC Live Webcast event:
1. Navigate to > > .
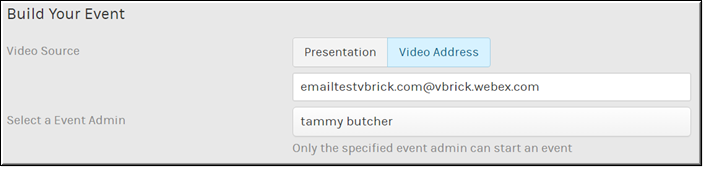
3. Select as the in the section.
4. Enter a valid video conference system address (SIP address) and select an .
5. The event will synchronize and broadcast what is shared on the Admin’s VC screen.
6. The event may then be hosted as a normal event and utilize all of Rev’s standard event features.
| Role(s): Event Admin, Account Admin (to schedule and provide the video conference address) |