Upload a Video From Your Hard Drive
Use the icon in the user menu bar to upload a video from your hard drive. You must have video upload permissions for this icon to be present.
| Tip: The recommended uploading format is .mp4 with an H.264 video codec and AAC audio codec. |

To upload a video from your local hard drive:
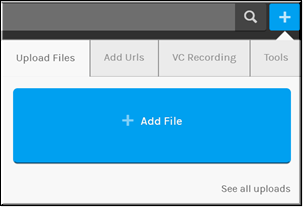
1. Click the icon on the menu bar.
2. Click the tab.
3. Click the box. You may select multiple files at once to upload.
4. Your most recent uploads will remain visible in the dropdown. Click to view them (or click the video title to go to the page). Click to clear the recent uploads.
5. Video uploads are automatically set to status by default
7. Once your video(s) have finished uploading and transcoding, you will receive an email with a link to the video. This means you do not have to keep manually checking your videos to see if they have finished processing.
| Note: By default, all uploaded video as well as video URLs (live and VOD) and recorded Webcasts are set to inactive status and must be manually activated. This allows you to control when videos are available for general viewing so that video settings such as thumbnails, categories, access controls, and so forth may be put in place before allowing your audience to view them. |
| Role(s): Account Admin, Media Admin, or Media Contributor |
See Also: